Introduction
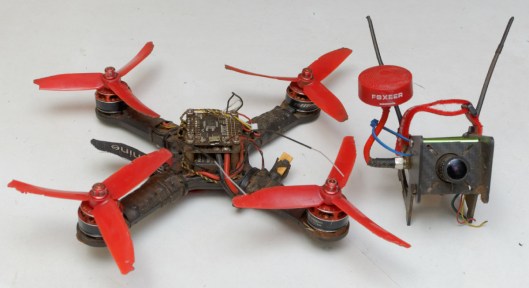
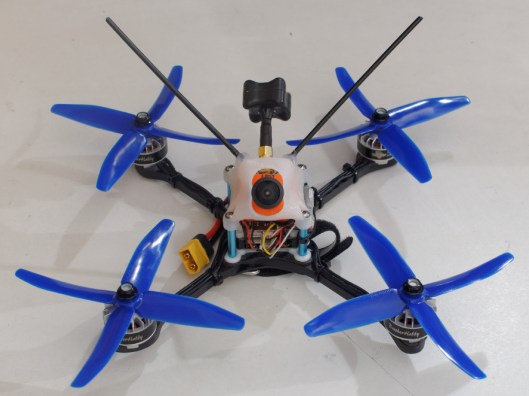
The Shendrones Flaco is a lightweight 210mm pure-X frame with skinny arms that can be easily replaced. Although the Flaco is probably one of the leading race quads, I’m not really building this for competition. For that I have my Krieger, which is built to take the punishment and meets the local requirement of a minimum all-up weight of 500g for the 5″ class. The Flaco will be my fun flyer for dancing in the sky. Pure exhilaration with a ridiculous power to weight ratio.
Parts List
| Part | Make & Model | Qty | Mass (g) |
Total (g) |
|---|---|---|---|---|
| Frame | Shendrones Flaco 5″ | 1 | 68 | 68 |
| Receiver | KS Servo SF800 | 1 | 4 | 4 |
| FC/OSD | Airbot Omnibus F4 Pro V3 | 1 | 7 | 7 |
| ESC | Aikon SEFM 30A 4-in-1 | 1 | 15 | 15 |
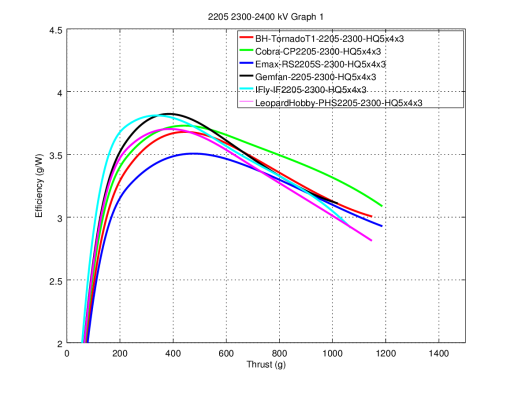
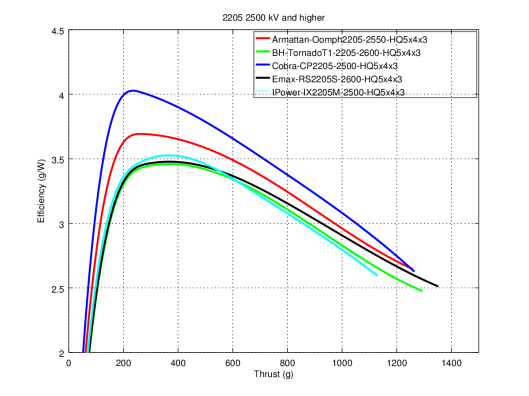
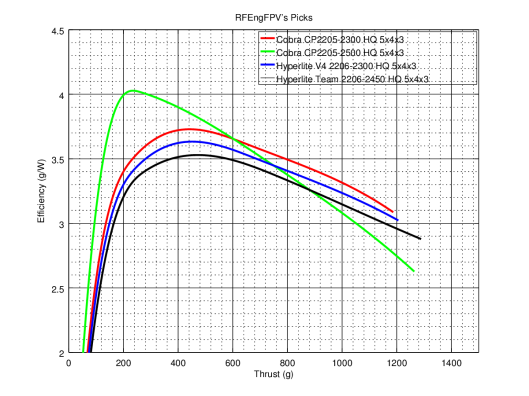
| Motors | BrotherHobby Tornado T2 2206-2300 | 4 | 31 | 124 |
| Props | DALProp Q5040 | 4 | 4 | 16 |
| FPV Camera | Runcam Eagle 4:3 | 1 | 16 | 16 |
| VTX | HGL Tech GTX226 SMA | 1 | 10 | 10 |
| Video Ant. | TBS Triumph Stubby RHCP SMA | 1 | 9 | 9 |
| Power Lead | Amass XT60 Pigtail 14 AWG | 1 | 10 | 10 |
| Misc. Hardware | Antenna Straws | 1 (cut in 2) | 3 | 3 |
| Misc. Hardware | 1 | 10 | 10 | |
| EXCL. BATTERY | 292 | |||
| Battery | Tattu 1050mAh 4S 75C | 1 | 125 | 125 |
| TOTAL | 417 |
You can get an 8% discount on the parts ordered from BangGood using the coupon code TOYSHO.
Frame Weight
Finally!!! My Flaco frame arrived today after a 10-week marathon journey from New York to Durban. The first thing I did was to put the frame together to check fitment and weight. Note that for my build I have replaced the standard long steel screws that go through the base plates and arms and up into the standoffs with 14mm titanium cap screws, which should save a couple of grams. I used the supplied screws and washers to secure the pod, since these are shorter and not subject to as much stress.
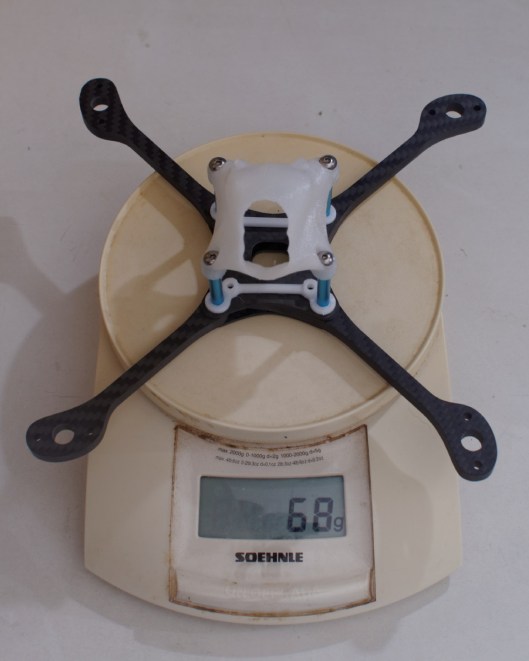
So according to my dubious kitchen scale, the frame is dead on weight, although it may be more like 70g with the standard steel screws. Note that this does not include the screws for the stack – there I’m going to use Nylon, also to save weight.
Soft-Mounting the Motors
I initially soft-mounted the motors using 3mm (1/8″) foam sealing tape. However although the foam tape is rated for use up to 70°C, after a couple of flights I found that the motor had moulded itself into the tape, and the tape was no longer providing any springiness, as a result of which the screws started backing out (even though I had applied a small amount of thread-locker to them). So for now I’ve reverted to hard-mounting the motors using the 9mm M3 screws that came with the frame.
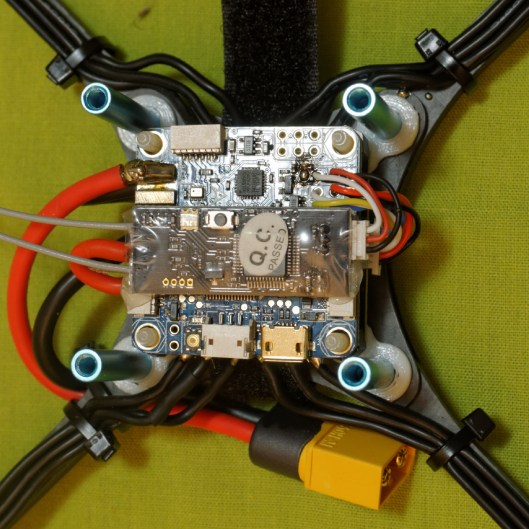
Fitting the Aikon SEFM 30A 4-in-1 ESC
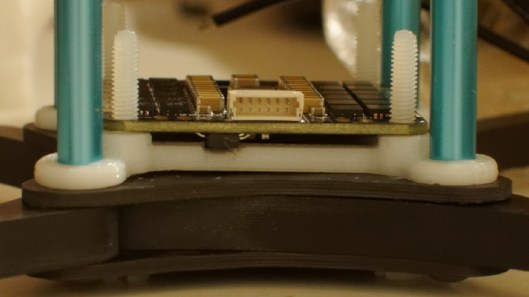
The 4-in-1 ESC sits low on the frame, with little space for the battery strap to pass between it and the frame. I installed the battery strap before building the stack, since I was concerned that pulling the strap through under the ESC might wipe components off the PCB.
Test fitting the Aikon SEFM 30 4-in-1 ESC showed there are a couple of clashes between components on the PCB and the white printed spacer that comes with the kit, so I made a couple of modifications to the spacers. First, I used side cutters to remove 180° of the raised flanges of both spacers. You should only cut this down to the level of the main body of the spacer, so you don’t weaken it too much. This is because the inside of these flanges clash with the FETs on the PCB.

I also had to make small notches in both of the spacers to prevent interference with ICs on the PCB. I used my craft market cut a small notchs in the top side of the spacers, less than 0.5mm deep, just sufficient to prevent the IC cases from pushing against the spacers when the PCB is seated against the spacer flanges.
The Aikon SEFM 4-in-1 is great to build with – all the connections are in logical places (motor wires off to the side, battery at the back, control signals at the front), and generally the board seems well built. The plug in connector for the signal wires makes it simple to remove the FC from the stack if necessary – simply unplug the control connector, then hinge it up and over 180° since the power connections between the ESC and FC are all on the other side.
There’s one significant annoyance, though – the large battery pads (at bottom in the pic below) have inadequate thermal relief, making it hard to get a satisfactory solder joint. My 30W iron could not heat it up sufficiently to melt the solder properly, but eventually I managed more or less satisfactory joints by using both my 30W and 15W irons together!
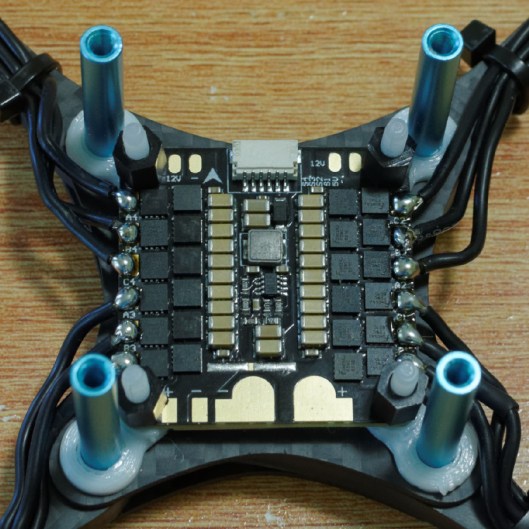
The motor wires on my Tornado T2s were just the right length – I didn’t even have to trim the wires that connect to the ESC furthest from the motor. The wires were all connected in the same order, without cross-overs, and I reversed motors 2 and 3 in BLHeli Suite.
Flight Controller
I used the Airbot Omnibus F4 Pro V3. It has a built-in Betaflight OSD with an on-board current sensor. It does not include a PDB and goes very well with the AIkon SEFM 4-in-1 ESC which includes 5V and 12V BECs. However there seem to be several different versions around, with different connections, and it is poorly documented. Mine was Version 3, which is shown below:
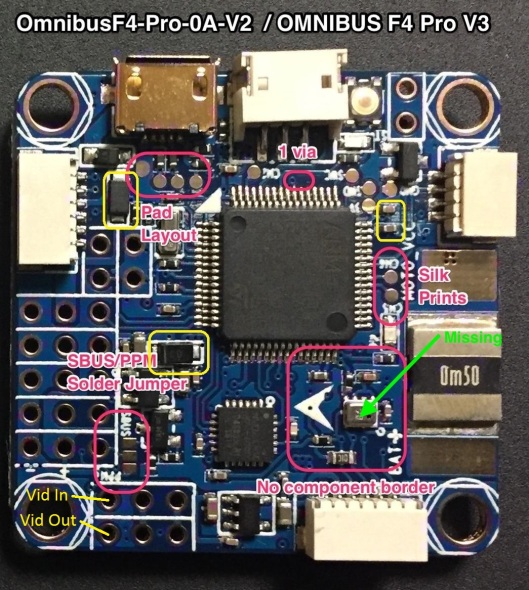
Note the labels for “Vid In”, which is video input to the OSD from the camera output, and “Vid Out”, which is the OSD output to the VTX. This is the correct orientation of these connectors for this revision of the Omnibus FC. I have seen other published diagrams with these connections reversed, which may apply to a different revision. The serial receiver is on UART1 (not UART6 as it apparently is for some versions of the board). UART1 is only visible if the SBUS/PPM jumper is set for SBUS.
I installed Betaflight target OMNIBUSF4SD revision 3.1.7 with no problems. BLHeli pass-through works as expected.
Even though the arrow on the PCB was aligned with the direction of flight, I still had to set “CW 270” for the gyro and accelerometer in Betaflight. It amazes me that the engineers can’t get something this simple right!
Runcam Eagle
I bought a Runcam Eagle 4:3 FPV camera for this build not knowing whether it would fit the pod, since it is slightly larger than the HS1177 that the pod is designed for, and the lens is also a different size. The good news is that it does fit! You have to squeeze the pod slightly to open up the opening where the camera lens fits, but it goes in just fine. I’m not sure that one could snap the lens between the 30°, 45° and 60° openings, though, as it is a very tight fit. That doesn’t really matter to me as I’m happy to leave mine at 45°.
I suggest you fit the pigtail before inserting the screws that hold the Eagle into the pod, as once fitted it’s quite tight to get the through-bulkhead SMA connector past the connector on the camera (although I was able to do it).
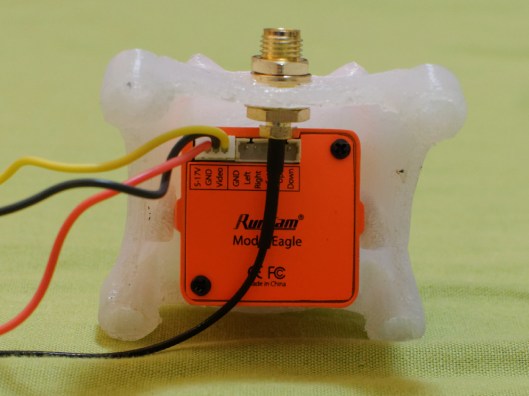
The Eagle over-sharpens the image by default, which shows us as irritating jagged sparkling as you fly. After the first flight, I used the camera’s OSD menu to set both “detail” and “edge” sharpening to manual with value 5.
RC Receiver
I’m using the SF800 Futaba S-FHSS compatible receiver. I hot-glued the receiver on top of the flight controller PCB. The glue is only on two connectors on either side of the FC board, so there’s no risk of ripping off components. I’ a bit concerned whether the proximity of the microcontroller will cause EMC problems for the receiver, as it is not shielded; however in a build this tight there’s not much alternative.
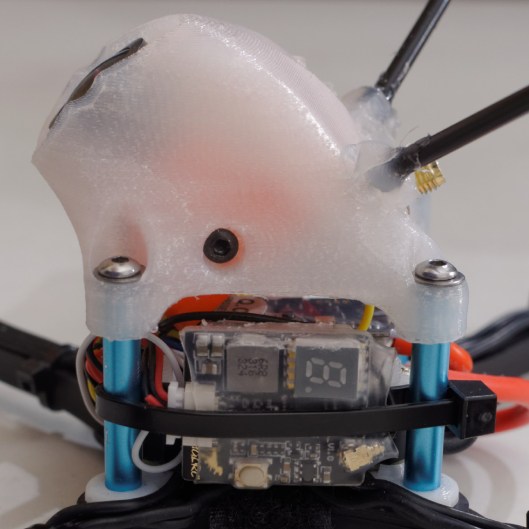
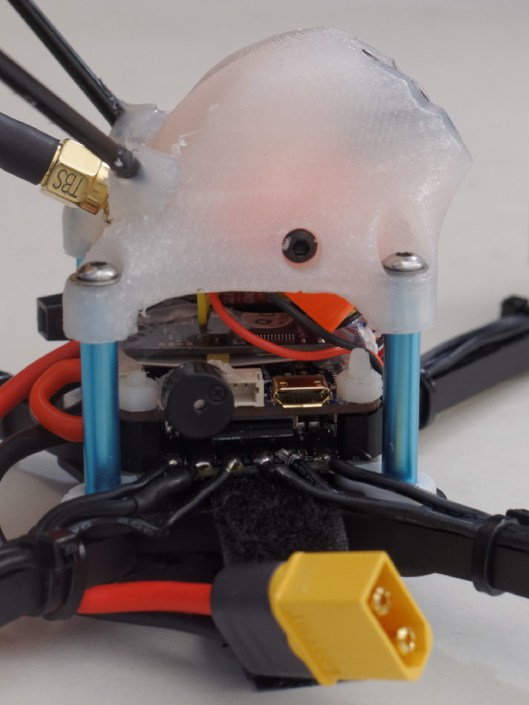
The antennas slip into antenna straws that are hot-glued in place on the pod, using the holes in the pod that Andy Shen provided for this purpose.
Video Transmitter
I was originally intending to use the TBS Unify Pro VTX to take advantage of SmartAudio to allow the OSD to control the VTX so it did not require physical access to change channel and output power. However the Unify Pro was out of stock when I ordered, and in any case would have required paying additional shipping costs, so instead I chose the smallest conventional VTX with 600 mW output and a pigtail antenna socket that I could find, the HGL Tech GTX226. Mounting it so the control button and LED are accessible proved a challenge given the small size of the Flaco pod. Eventually I zip-tied it between the left-hand pillars of the pod, where it does not interfere with access to the USB port (it does obstruct the SPI port, but I have no need to access that). The zip-tie goes over the power and video in connector, so it does not press against the small SMD components on the PCB.
I powered both the VTX and the Runcam Eagle camera from the SEFM 4-in-1 12V supply, which should give them some protection against spikes on the main battery power supply.
Finishing Touches
Open cell foam over the baro sensor on the flight controller, lost model buzzer and a strip of self-adhesive velcro under the frame to help hold the battery in place. The picture shows the buzzer, which is hot-glued on the side of the PCB by the buzzer pads, taking care to leave the SD slot clear.
Weight (excl. battery)
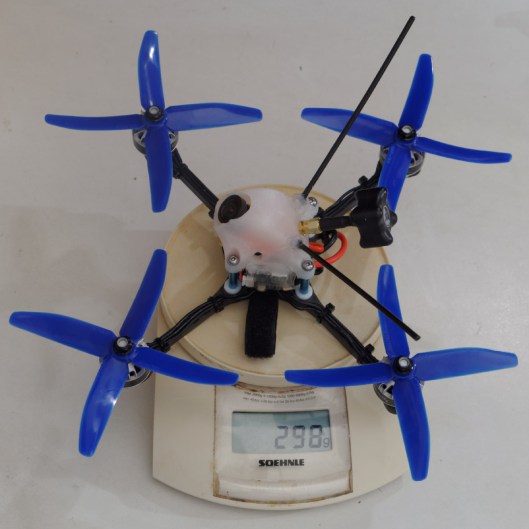
OK, so I missed my estimated weight by 6g. It’s still under 300g, though 🙂
Final Thoughts
Miniquad frames have come a long way since my first ZMR250! The use of 3D printed parts like the Flaco’s “facegrabber” pod allows much more sophisticated 3D shapes to be incorporated into the design, which is both attractive and functional. The pod is printed from Nylon, which is much stiffer than TPU, so it also contributes significantly to the rigidity and strength of the quad. Having mounting holes incorporated into the design for the camera and antennas makes construction a breeze. The printed spacers are also great, since they will hold the stack in place while replacing an arm, but could perhaps be redesigned to improve clearance from the PCB components (although it only took 5 minutes with a craft knife to fix this, so no biggie).
The Aikon SEFM 4-in-1 ESC also shortens construction time, as well as allowing skinny arms for lower drag and better prop performance. Overall I was very impressed; it just could do with better thermal relief (or I need a more powerful soldering iron).
The Airbot Omnibus Pro FC is also nice. It’s built like a typical FC, and does not have the same quality feel as the ESC. However the Betaflight OSD with built-in current sensor and baro (for altitude readings) is brilliant. The SD card data logger should also make tuning simpler. I’ve heard of issues with the 5V regulator on the F4 boards overheating, but so far have not experienced any problems, although I powered my flight camera and VTX from the ESC 12V output to avoid stressing the FC BEC.
The GTX226 VTX is nice and small (I think I would have struggled to fit a Foxeer TM25 Switcher in) and allows 25/200/600mW operation. It seems to get quite hot, though, even running at 25mW (admittedly without airflow to cool it). It should handle 200mW without a problem, but I’ll have to see whether it is reliable at 600mW output.
Altogether a most enjoyable build, and I’m looking forward to the maiden!